Drawing with Shapes
In this application you can add new graphics to a new or existing PDF page. You do this by adding Shape objects to a Canvas object that is associated with a Page. Shape is an abstract base class and we offer a collection of concrete specializations such as TextShape, ImageShape and PageShape.
Canvas
A canvas is the top-level container of shape objects. Each page has 4 canvas objects that are accessed through the following Page properties: Overlay, VisualOverlay, Underlay and VisualUnderlay.
When you add shapes to Overlay or VisualOverlay, they appear on top of the existing content. In other words, shapes in these canvasses may occlude the existing content.
When you add shapes to Underlay or VisualUnderlay, they appear behind the existing content. In other words, shapes in these canvasses may be occluded by the existing content. There is a catch that the existing content of a page has an opaque white area spanning the entire page. In this case you will not see any shapes in Underlay or VisualUnderlay. You may be surprised by this because you assume that the white opaque area is actually empty page area.
The distinction between VisualOverlay and Overlay proper lies in the fact that VisualOverlay accounts for any cropping or rotation of the page. The same holds for VisualUnderlay and Underlay. This is shown is the figure below. The bounding box in visual page space is the intersection of the media box and the crop box.
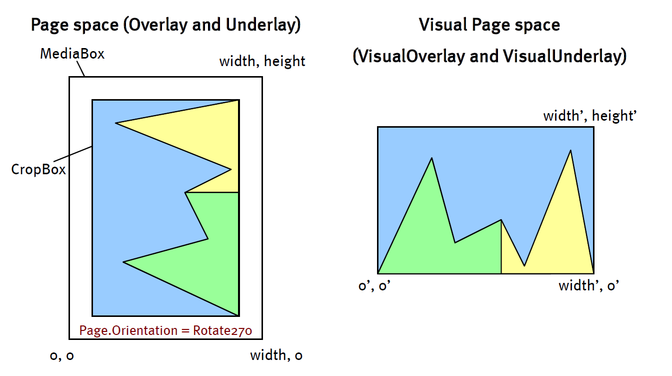
Page space versus Visual page space
Base class Shape
All shapes inherit directly or indirectly from Shape.
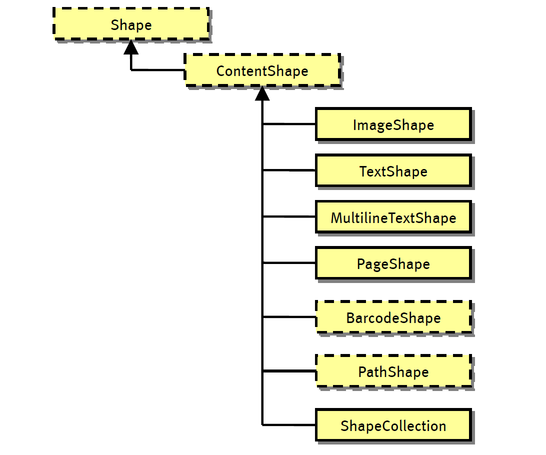
Partial shapes class hierarchy
ContentShape
ContentShape adds the following properties to specify transformation, blend mode and opacity.
Public properties specific to ContentShape
| Public properties | |
|---|---|
| Opacity | 0 means fully transparent. 255 means fully opaque. |
| BlendMode | Defines how this content shape blends with its background. Default is Inherit (meaning: the same as its parent). |
| Transform | The geometric transformation applied to this content shape. Default is no transformation. |
Destination
The ContentShape.Transform property lets you apply any geometric transform to a ContentShape. It is modelled after the WPF equivalent. This is described in more detail in Section Transforming content shapes.
TextShape
TextShape lets you draw single-line text. The X and Y properties that are inherited from Shape, correspond to the lower-left corner. The following table lists the public properties of TextShape.
Public properties specific to TextShape
| Public properties | |
|---|---|
| Text | The text that is displayed. |
| MeasuredWidth, MeasuredHeight | Read-only properties that reflect the size of the text with the current settings. |
| Pen, Brush, Font, FontSize, Italic, Bold | Appearance properties. |
| ReadDirection | Read direction (left-to-right or right-to-left). |
| BoundingBox | The bounding box after rotation is applied. |
MultilineTextShape
MultilineTextShape lets you draw multi-line text with mixed formatting.
The content of the multi-line text shape is specified as a collection of fragments. Each fragment has properties that specify both content and appearance. All fragments will be displayed concatenated and broken across lines as needed.
As opposed to the single-line TextShape you can set the Width. This determines where lines break. In addition you can set the Height property but this is only useful if the multi-line text shape is auto-sized. This is the case if and only if there is exactly one fragment that has a zero font size.
Barcodes
Currently we offer 3 barcode shapes: Code128BarcodeShape, Code2of5BarcodeShape and Code3of9BarcodeShape. They all inherit from the abstract base class OneDimensionalBarcodeShape, which in turn inherits from the abstract base class BarcodeShape, which in turn inherits from Shape. We anticipate adding 2-dimensional barcode shapes, hence this hierarchy.
ShapeCollection
There is a special shape called ShapeCollection which is a group of shape objects. Because a ShapeCollection is a Shape, it allows nesting of shapes to any depth. The purpose of ShapeCollection becomes clear if we look at the members that are specific to ShapeCollection.
Public properties specific to ShapeCollection
| Public properties (typical collection members omitted) | |
|---|---|
| Width, Height | Width and Height of the shape collection with respect to the parent coordinate space. This parent is either a ShapeCollection or a Canvas. |
| VirtualWidth, VirtualHeight | These are the width and height of the shape collection as seen by the child shapes. If these are different than Width and Height, a scaling is applied. VirtualWidth and VirtualHeight decouple the dimensions of the child shapes from the actual size of the parent shape collection. |
| Clip | Clip the child shapes to the Width and Height. |
PathShape
PathShape is the abstract base class of all shapes that involve stroking and filling. The table below shows the public members that are specific to PathShape.
Public properties specific to PathShape
| Public properties | |
|---|---|
| Pen | This Pen is used to stroke this path shape. |
| Brush | This Brush is used to fill the closed region of this path shape. |
Below is the class hierarchy starting with the PathShape.
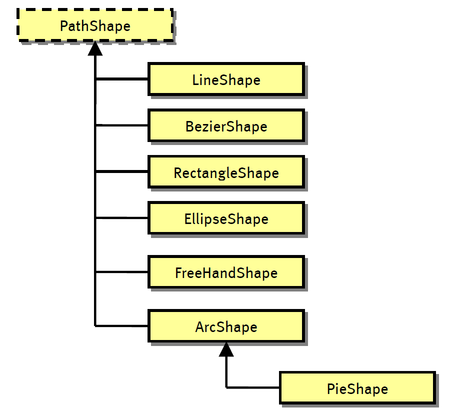
PathShape and derived classes
FreeHandShape
The FreeHandShape allow you to build an arbitray curve composed of straight lines and bezier curves. The table below shows the members that are specific to FreeHandShape.
Public properties of FreeHandShape
| Public properties | |
|---|---|
| Paths | A collection of FreeHandPath objects. You build a freehand shape by adding paths to this collection. |
| FillRule | Defines according to which fill rule the interior is filled. Can be either FillRule.NonzeroWindingNumber or FillRule.EvenOdd. |
The following code shows a typical usage of the FreeHandShape:
FreeHandShape freeHandShape = new FreeHandShape();
page.Overlay.Add(freeHandShape);

freeHandShape.Pen = new Pen(GrayColor.Black);
freeHandShape.Brush = new SolidBrush(RgbColor.Red);

FreeHandPath path = new FreeHandPath();
path.Closed = true;
freeHandShape.Paths.Add(path);

path.Segments.Add(new FreeHandStartSegment(150, 150));
path.Segments.Add(new FreeHandLineSegment(400, 150));
path.Segments.Add(new FreeHandBezierSegment(250, 200, 300, 550, 400, 400));
Code sample: FreeHandShape
The result looks like this:

Docking
Sometimes you do not want to or you cannot specify exact positions. Instead you want shapes to be stacked or docked in some direction. The top-level class Shape has a property Dock of type DockStyle. The default value is DockStyle.None meaning that the shape is positioned at exact coordinates. Setting the Dock property to any of the other values turns on docking behavior that is similar to the how Winforms controls can be docked.
Transforming content shape
The ContentShape.Transform property lets you apply a geomatric transformation to a ContentShape object. It lets you position, rotate, scale and skew content shapes or apply any combination of these.
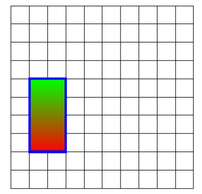
The following code draws an untransformed RectangleShape. The grid has a 30 pts unit.
RectangleShape rect1 = new RectangleShape(60, 120);
rect1.Pen = new Pen(RgbColor.Blue, 3);
rect1.Brush = new AxialGradientBrush(
   RgbColor.Red, RgbColor.Green, 0, 0, 0, rect1.Height);
shapes.Add(rect1);
Code sample: Draw an untransformed rectangle
This looks as follows:
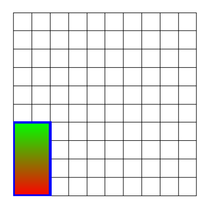
The following code adds a translation:
RectangleShape rect2 = new RectangleShape(60, 120);
rect2.Transform = new TranslateTransform(30, 60);
rect2.Pen = new Pen(RgbColor.Blue, 3);
rect2.Brush = new AxialGradientBrush(
   RgbColor.Red, RgbColor.Green, 0, 0, 0, rect2.Height);
shapes.Add(rect2);
Code sample: Translate a rectangle shape
This looks as follows:
The following code adds a rotation:
RectangleShape rect3 = new RectangleShape(60, 120);
TransformCollection transforms = new TransformCollection();
rect3.Transform = transforms;
transforms.Add(new TranslateTransform(30, 60));
transforms.Add(new RotateTransform(30));
rect3.Pen = new Pen(RgbColor.Blue, 3);
rect3.Brush = new AxialGradientBrush(
   RgbColor.Red, RgbColor.Green, 0, 0, 0, rect3.Height);
shapes.Add(rect3);
Code sample: Translate and then rotate a rectangle
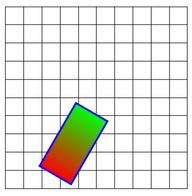
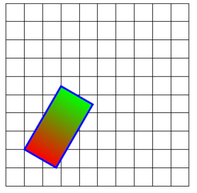
Note that the rectangle is rotated around the origin of the parent, not around its own origin. If you want to rotate it such that the lower-left corner of the rotated rectangle lies at [30,60], then you would need to inverse the transformation order and use the following code:
RectangleShape rect4 = new RectangleShape(60, 120);
TransformCollection transforms = new TransformCollection();
rect4.Transform = transforms;
transforms.Add(new RotateTransform(30));
transforms.Add(new TranslateTransform(30, 60));
rect4.Pen = new Pen(RgbColor.Blue, 3);
rect4.Brush = new AxialGradientBrush(
   RgbColor.Red, RgbColor.Green, 0, 0, 0, rect4.Height);
shapes.Add(rect4);
Code sample: Rotate and then translate a rectangle
Clipping
Clipping is done through the ClipShape property. You add it to a shape collection just like the other shapes. It only clips shapes that are added to the same collection after the ClipShape. You can have multiple clip shapes in a single collection. The ClipShape is defined just like the FreeHandShape using a FreeHandPath.
The following code creates a clipping path and clips an image:
ImageShape image = new ImageShape(@"..\..\flowers.jpg");

Page page = new Page(image.Width, image.Height);
document.Pages.Add(page);

ShapeCollection shapes = new ShapeCollection(page.Width, page.Height);
page.Overlay.Add(shapes);

ClipShape clip = new ClipShape();
FreeHandPath path = new FreeHandPath();
clip.Paths.Add(path);

path.Segments.Add(new FreeHandStartSegment(150, 150));
path.Segments.Add(new FreeHandLineSegment(400, 150));
path.Segments.Add(new FreeHandBezierSegment(250, 200, 300, 550, 400, 400));

shapes.Add(clip);
shapes.Add(image);
Code sample: Clipping an image using a ClipShape
It looks as follows:

ShapeCollection.Clip
If this property is set, then everything outside the boundaries of the ShapeCollection is clipped.